Additional sizes may be available!
Additional sizes may be available! Email me when available|
Product Notes:
· We cannot ship this product to Alaska. |

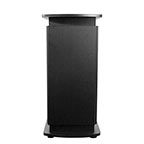
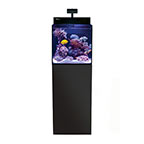
Overview
| * | Updated aquarium stand for the Nano-Cube HQI aquarium system |
| * | Modern stand design features storage area, dual shelves, and more |
| * | Cabinet-style aquarium furniture houses a compact aquarium chiller |
Modern and functional display for your 28 gallon Nano Cube aquarium. Cabinet-style stand raises your aquarium 32-1/2" and positions it for optimal viewing. Also helps ease accessibility for routine aquarium maintenance. Features two shelves - one removable from inside the aquarium stand cabinet and one stationary just below your 28 gallon Nano Cube aquarium. Vented storage compartment accommodates a compact aquarium chiller (sold separately) without restricting necessary airflow. Hinged door hides unsightly aquarium necessities while chrome risers beneath aquarium shelf accent all your 28 gallon Nano Cube aquarium has to offer. Stand measures 18-1/2" x 23-1/2" x 32-1/2" high overall. Medium density fiberboard construction. Charcoal gray. Assembly required.
Hardware Included:
- 4 - Cabinet Foot/Stand Legs
- 2 - Hinges
- 2 - Hinge Mounting Plates
- 15 - 1/2" Screws
- 8 - 2" Screws
- 16 - Wood Dowels
- 4 - Mounting Chrome Cylinders
- 4 - Flat Head Screws for Chrome Cylinder
- 4 - Top Mounting Plates for Chrome Cylinder
- 4 - Bottom Mounting Plates for Chrome Cylinder
- 4 - Shelf Holders
- 1 - Door Knob
Cabinet Components
- 2 - Side Panels (A1, Left Side & A2, Right Side)
- 1 - Bottom Panel (B1)
- 1 - Mid Shelf Panel (B2)
- 1 - Top Shelf Panel (B3)
- 1 - Back Panel (C)
- 1 - Accessory Shelf (D)
- 1 - Front Access Door (E)
- Attach each Mounting Plate to Right Side Panel with included 1/2" screws.
- Insert 4 Wood Dowels into corresponding holes on Left Side Panel.
- Attach Left Side Panel to Back Panel.
- Insert 4 Wood Dowels into corresponding holes on Right Side Panel.
- Attach Right Side Panel to Back Panel.
- Insert 8 Wood Dowels into corresponding holes on Bottom Panel.
- Attach Right and Left Side Panels and Back Panel to Bottom Panel by lining up corresponding holes on each panel to the Wood Dowels placed in Bottom Panel.
- Insert 2" Screws to fasten Bottom Panel to each Side and Back Panels.
- Attach 4 Cabinet Feet to Bottom Panel, using included Feet Screws to fasten to Bottom Panel.
- Insert 4 Wood Dowels into Mid Shelf Panel.
- Attach Mid Shelf Panel to lower assembly by lining up the corresponding holes on each of the Left and Right Side Panels and Back Panel.
- Insert 2" Screws to fasten Mid Shelf Panel to lower assembly.
- Take apart Chrome Cylinder Assembly and attach all 4 Chrome Cylinder Assemblies to Stand:
- Remove Flat Head Screw from Bottom Mounting Plate.
- Attach Bottom Mounting Plate to Mid Shelf.
- Line up 2 holes to Bottom Mounting Plate - Insert 2" Screws and tighten.
- Insert Flat Head Screw into center of Bottom Mounting Plate. Hand tighten.
- Screw Chrome Cylinder to Hex Screw. Hand tighten.
- Unscrew Top Mounting Screw from Top Mounting Plate.
- Lay Top Shelf Panel on top of Chrome Cylinders.
- Line up holes - Insert screws from step 13.f above and tighten.
- Mount Door to Hinges on Right Side Panel by lining up holes on Door to Hinges - Screw and tighten.
- Attach 4 Shelf Holders to inside of Right and Left Side Panels.
- Slide Shelf into Cabinet and place on top of Shelf Holders.
- Attach Door Knob by place 3/4" Door Knob Screw through inside of Door. Hand screw Door Knob onto Door Knob Screw. Do not over-tighten.