Additional sizes may be available!
Additional sizes may be available! Email me when available
Overview
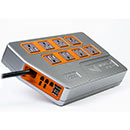
| * | Multi-system aquarium timer and power strip in one convenient unit |
| * | Simultaneously control light fixtures, wave-makers, and other electrical aquarium devices |
| * | Automate aquarium equipment to save time, effort, and money |
Easy-to-use Power Center means clutter-free custom illumination. Combines 24-hour timer(s) and 8-outlet indoor power strip for seamless transition from dawn to dusk lighting conditions. Power Center has 4 constant-power outlets and 4 alternating timer-controlled outlets (2 daytime/2 nighttime). Enhanced digital feature allows alternating timer to set the day-night cycle at different times of the day at different days of the week.
Features: Sliding safety covers, 3 ft power cord with grounded plug. 15 amp 120 volt (1875 watt max); UL-Listed. Measures 3" x 10-1/2" x 1-1/2" high.
Note: Use Digital Power Center for Metal Halide fixtures greater than 250W to prevent timer "memory loss" due to overheating.
Digital Power Center Instructions
Safety Feature: Slide out Safety Cover before using unit.
Battery Installation
- Remove Battery Cover from back of timer.
- Remove Battery Seal and reinstall battery ("AG13" Mercury Battery).
- Replace Battery Cover onto the Power Center. Note: Battery will activate Display screen and start clock automatically.
- Plug Power Center into a grounded three-pronged receptacle controlled by a GFCI.
- Turn on Power Center ON/OFF switch (red light is visible when power in on). Note: Battery serves as a backup power for timer setting, Replace battery every 9 months.
Timer Setting for the Digital Power Center
Time Cycle ON/OFF Yellow (daytime) and Blue (nighttime) outlets alternate power, both outlets cannot be on at the same time. When Yellow (daytime) outlets are on, the Blue (nighttime) outlets are off. When the Yellow (daytime) outlets turn off, the Blue (nighttime) outlets are switched on automatically.
Setting Day and Time
- Hold down the "CLK" (clock) button and press:
- DAY button to set the day of the week.
- HOUR and MIN buttons to set the current time of day.
Setting Timers
Time Cycle ON/OFF
Note: Yellow (daytime) and Blue (nighttime) outlets alternate power. Both outlets cannot be ON at the same time. When Yellow (daytime) outlets are ON, the Blue (nighttime) outlets are OFF. The Blue (nighttime) outlets are switched ON automatically.
Timer Setting
- Press PRG button once. Yellow (daytime) outlets are ON.
- Press DAY button repeatedly and select desired day(s) the Yellow (daytime) outlets will be turned ON. For example:
- Every Day: MO TU WE TH FR SA SU
- Single Day: WE
- Weekdays: MO TU WE TH FR
- Weekends: SA SU
- Press HOUR and MIN buttons to set the time of day that t he Yellow (daytime) outlets are turned ON.
- Press PRG button once. Yellow (daytime) outlets OFF.
- Press DAY Button repeatedly and select desired day(s) that the Yellow (daytime) outlets will turn OFF.
- Press HOUR and MIN buttons to set the time of day that the Yellow (daytime) outlets will turn OFF.
- To set time cycle, repeat timer setting (Steps 1-6).
- When timer settings are complete, press CLK button to exit timer setting program and return to clock display.
Review/Edit Timer Settings
- Press the PRG button to check and display timer settings.
- To change a Time Cycle Setting, press PRG button to display the incorrect time and press DAY, HOUR, and MIN to edit.
- When settings are complete, press CLK button to exit timer setting program and return to clock display.
Deleting Timer Setting
- Press the PRG Button to Check and display timer settings.
- Locate the time cycle to be deleted.
- Hold MODE button down and press PRG button to clear the time cycle.
Activating Time Cycle
Mode Button Functions
- Press the MODE button to display:
- OFF: Yellow (daytime) outlets OFF
Blue (nighttime) outlets ON - ON: Yellow (daytime) outlets ON
Blue (nighttime) outlets OFF - AUTO: Programmed Time cycle(s) timer settings activated.
- RDM: Activate ± 15 minutes before and after Time Cycle 1 and Time Cycle 2.
- OFF: Yellow (daytime) outlets OFF